


FRAMEWORK: CAKE
on whimsical cakes and saving my spoons

Three years ago my life cracked into two when I stumbled across the work of YIP Studio NYC: before cake and after cake. The fabric of what I thought of as possible for food to achieve warped and distressed, became less surface more web, became less rigid more flimsy and fantastical.
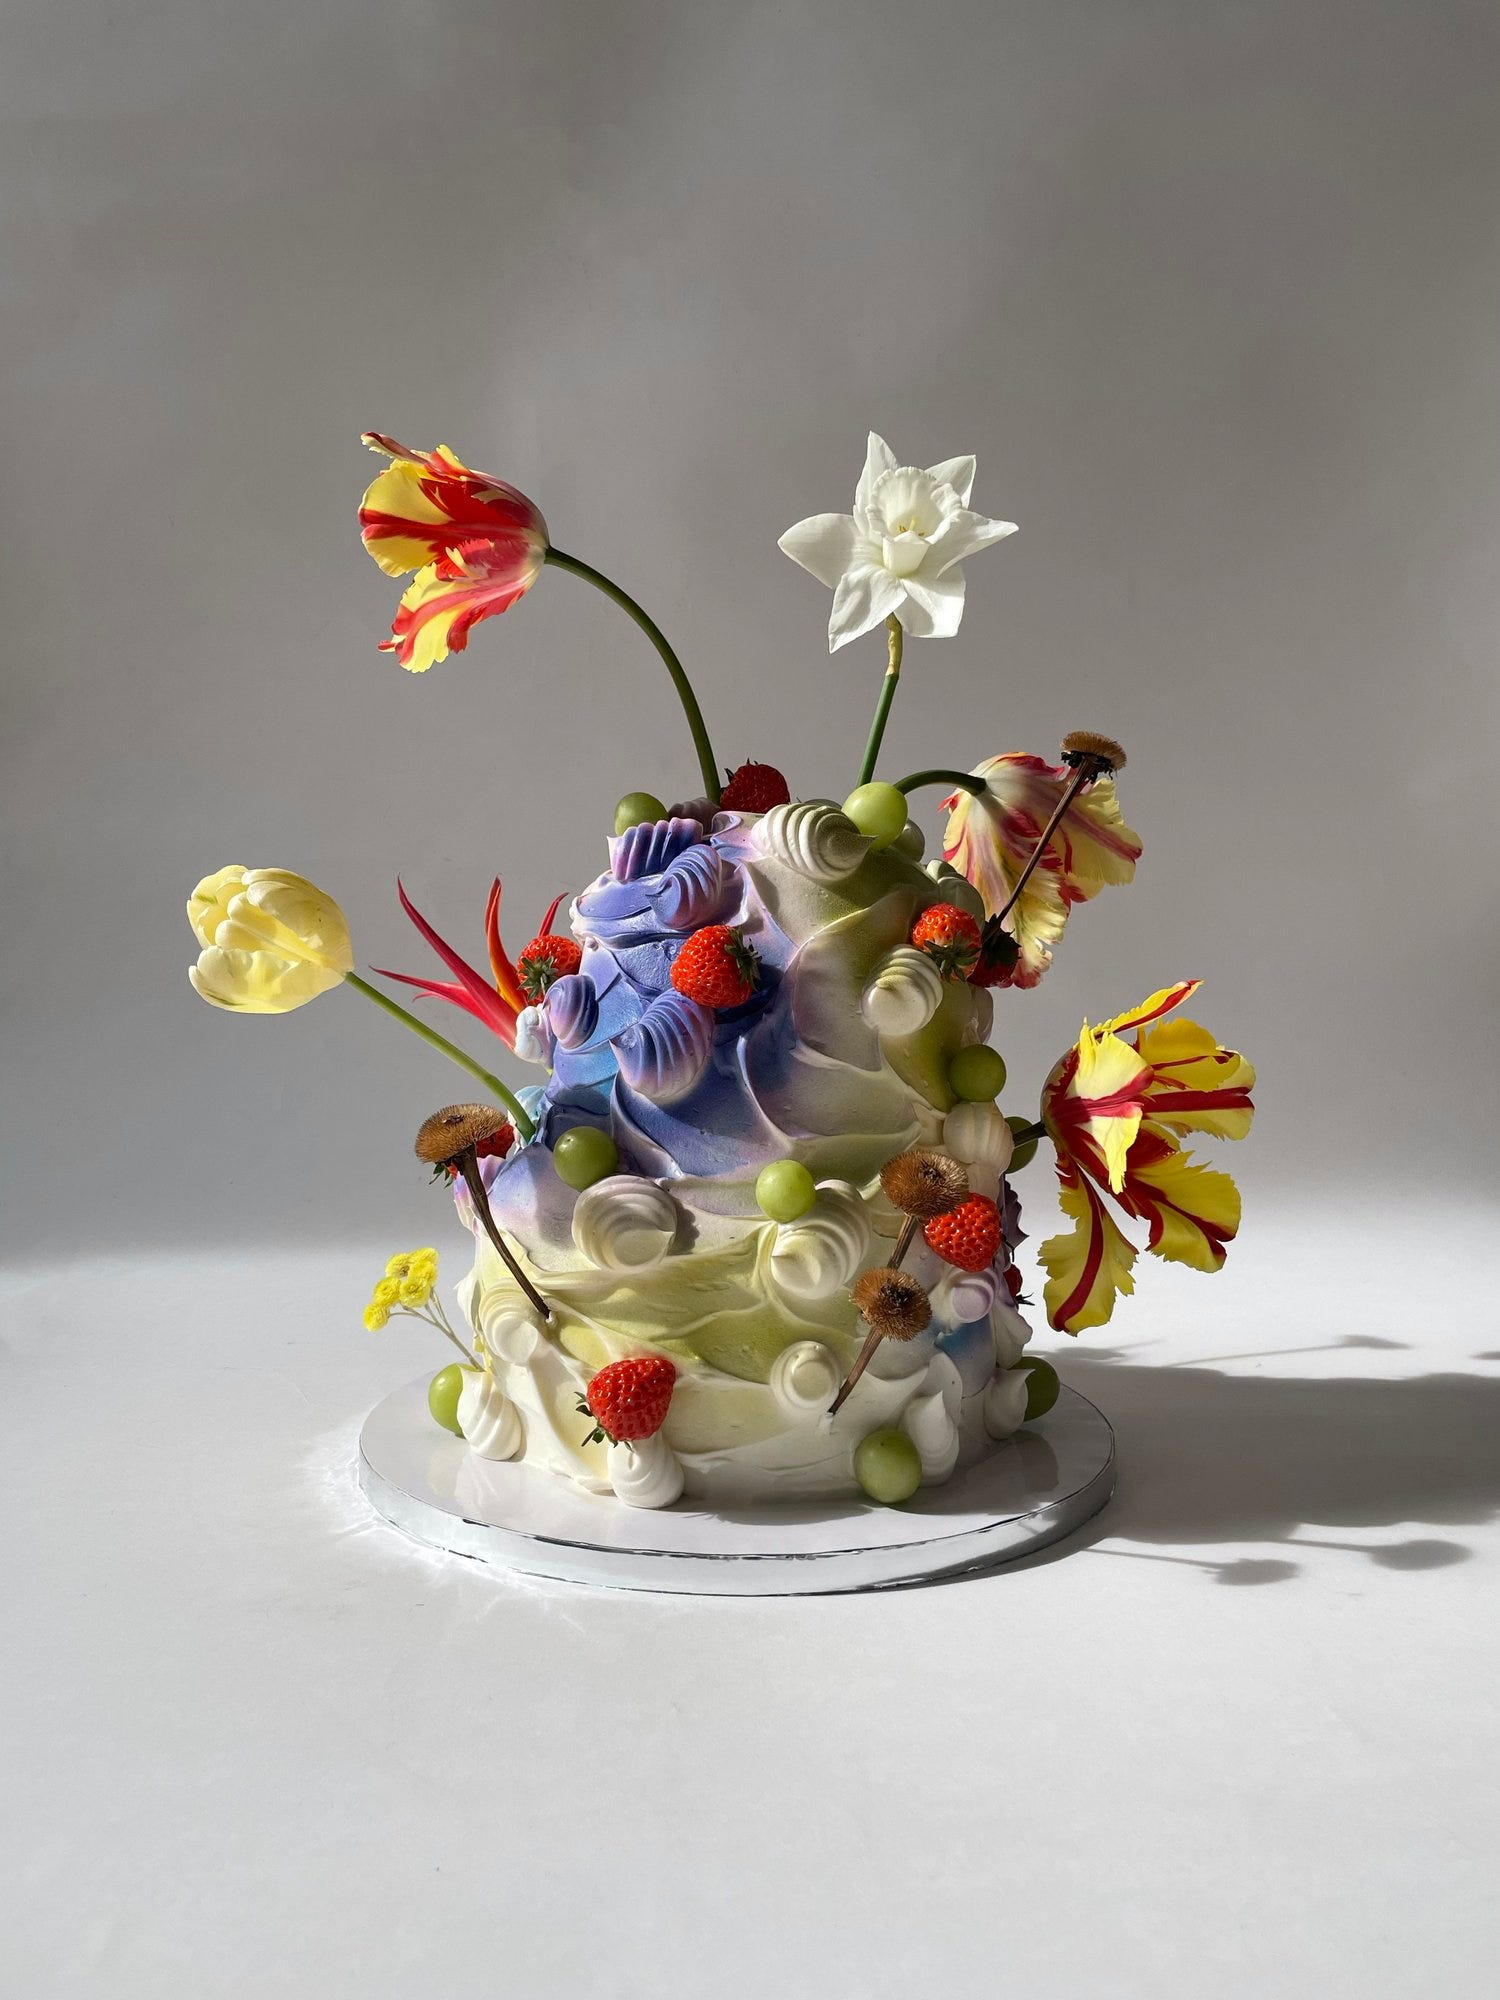
I have stared in awe of the work of YIP and others around the world building these bizarre creatures in the form of cake for hours, days, weeks, years, zooming in on every magnificent lump of icing, mound of jelly, chaos of flowers and dehydrated fruit, dusting of glitter, crown of metallic sprinkles. These cakes are bejeweled and beastly and exquisite. They are controversial: people write of them as “ugly” and “unhinged”. They are queer in that they are a beyond, a transgression.
It is not an understatement to say that my aesthetic sensibilities changed forever because of my love for these cakes — it is not even an understatement to say that my love for the world changed forever because of my love for these cakes.
It wasn’t enough for me to just look at them, I had to have them, which meant I had to make them. And I had to make them while being chronically fatigued, in debilitating full-body pain, and brain fogged to the point of blankness. I was also working a full time job. I was also significantly lactose intolerant, which meant that I could not rely on the more conventional and easy to work with kinds of icing like buttercream and ganache. That’s the logistics — in terms of skill, I also had no practice as a baker, had never followed a recipe properly in my life, and have a limited capacity for visual imagination.
Luckily, my obsession with cake making was and continues to be strong enough for these conditions to not feel like absolute deterrents to me. I approach them instead as facts to make arrangements around — essentially what spoonie wisdom comes down to. The most basic care to take is to split the task into smaller clusters, which, here, means:
determining and purchasing ingredients
making the batter and baking the sponge
preparing any additional elements: syrups for soaks, jellies, jams, etc
readying and assembling the icing
readying and assembling the decorations
cleaning up
All six of these steps can be done seated, with some movement required to shift between counter, sink, oven, and fridge. I have been able to complete all steps other than #1 without standing using my rollator. #2 takes about 30 more minutes for me than I imagine it will. #4 and #5 take the most spoons to complete. #6 is urgent for some things more than others. I try to conserve and spend energy accordingly.
The amazing thing about the cake making process is that generally there has to be a break between each of these steps: some ingredients need to be brought to room temperature, cake bases need to cool, jellies need to set, icing needs to be cooled (several times sometimes, depending on the temperature of your kitchen), and decorations need to be done in stages. Once done, the cake needs to sit in the fridge again for the shape to hold and flavours to compose into one another.
That’s a lot of time between the Idea and the Completion. That’s a good thing. The process tells you that it’s not just OK to take breaks, it’s essential to — for you and for the cake.
The second care to take is to make each step as easy as possible. Time to cut corners! Literally: for example, instead of making three different cake sponges, make one big one and cut out the layers; shave off the tops and sides of all your cakes to make them easier to work with. Figuratively: for example,
for ingredients: use what you have already as far as possible, switch out ingredients that are easier for you to get your hands on (e.g. if you don’t have butter use oil)
for the recipe: following a recipe can be really daunting and something I still find really difficult. I can’t measure for shit and I always forget something. honestly though… if you’ve used the basic components (flour of some kind, fat of some kind, sugar of some kind, egg/other leavening agent, milk of some kind, baking powder + soda) and the batter tastes good, the cake will be good too. let the batter sit for 10 minutes before putting it in the oven. if using non dairy milk add a splash of apple cider vinegar or some kinda citrus even if your recipe says otherwise.
to save yourself the hassle, you can also use a pre-made cake mix instead and personalize it if you feel like it, or buy a ready-made sponge. I know these are obvious alternatives — I include them only because I sometimes I need to remind myself that “skipping” a step is not failing it, it’s hacking it.for the batter: if possible, use an electric hand whisk to combine wet ingredients and only use a spoon (the larger the spoon the smaller the effort) to fold in dry ingredients. you can also just whisk the dry ingredients in if that’s easier. if following a recipe that tells you otherwise, ignore it, just use their proportions. lean the hand whisk against something instead of holding it yourself. you can also hold the container in your lap while seated and cradle the whisk in your arm for steadiness.
if you don’t have or don’t want to use a hand whisk, use a spoon instead of a normal whisk. whisks are so hard to clean it’s not worth it. wrapping a small towel around the handle of the spoon can make it easier to mix the batter. ideally there should be no clumps of flour in the batter — to save on time spent mixing with a spoon these can also be smushed by hand first.for the assembly: use a skewer or something to steady the cake if making more than one layer (take it out after icing has set). symmetry is over-rated just plop things wherever and however is easiest for you. cutting sponge into layers is really annoying if you don’t have the tools, it’s much easier to bake a thinner bigger cake.
for the topping: use ready-made whip topping and personalize from there. doing 1 short round (2-3 minutes) of whipping and letting it cool in the fridge will firm it up. follow it up with 1 more short round (20 seconds) of whipping before adding colourings.
for the decoration: use a cake turntable if you can get one, or just decorate one side at once instead of spinning it again and again. put the cake directly on the tray/plate/whatever final surface you’ll be using with a small dollop of icing. use items you can throw or sprinkle instead of having to place individually (sprinkles, edible glitter, any kinda dust like matcha or cocoa powder, POP ROCKS). skip using a piping bag if hands hurt a lot already before you start - the back of a spoon and a knife can also achieve some cool effects. if you can’t envision a final product when you start, you can think of a vague theme or color palette, or cover the cake in so many colorful things that it has no choice but to look good.
I don’t know if anyone reading this has consumed as much cake baking and decorating content as me to know that some of these are unconventional or even full-on no-nos.😈 I don’t mean for them to be instructions of any kind of course, just short-cuts I like and learned mostly just by not doing things I wasn’t able to or didn’t want to do.
It helps me to tell myself a few things before I begin. Like: It’s fine and even better for a cake to be made across the span of a full day or two, and for someone to help you, and for you to be messy and uncalculated. Less is more and more is more too. Mistakes and discards are inevitable.
The last one is especially difficult for me. I cried the previous time I made a cake because the pistachios I used to make a sponge with were stale and the cake tasted so bad I had to throw the whole thing out. I feel deeply guilty about ingredients, money, and electricity wasted. Time, effort, and excitement wasted are doubly painful when I have so little of them to spare. There is a cost to recovering from this guilt and pain — if I pre-empt that I cannot afford it, I hold off the baking till when I can.
Every time I get to make a cake for someone is the best time of my life. It’s the best gift I know to give. The making of the cake is my special occasion as much as the celebration it symbolizes.
It feels important for me to ensure that I cushion the process enough that it does not cause me any harm or leave me in a deficit. I try my best to protect my love for cake-making from pain, as in, I don’t want the cake to be interpretable as a sacrifice. I aim for slow, fun, easy. I aim for just-enough. I aim for all my love and as little of my body as possible. That’s the best gift I can give to myself.
I am endlessly grateful for role that my partner has played in all of my cakes so far. I trust and rely on their ideas for everything. They always make some part of the cake, usually the soak — an element of surprise, a sense of balance, and a delicious moistness that, well, without being too crude, is what I love about them too. They help me buy stuff, they calm me down when I go too fast, they reflect my excitement back to me, and they always, always eat with relish and abundance. That’s the best gift I could ever ask for.


That’s three levels of Best Gift in single cake: from me to you, from me to me, and from you to me. How infinitely special and how infinitely lucky.
xoxo
love this love u
Delightful read! Thank you for sharing and your cakes look wonderful! Sorry about pistachio cake and also, love that you approach cake making with fun and ease. Hope to eat some of your cake someday! Love you too!